> For the complete documentation index, see [llms.txt](https://alham-rizvi.gitbook.io/alhamrizvi/llms.txt). Markdown versions of documentation pages are available by appending `.md` to page URLs; this page is available as [Markdown](https://alham-rizvi.gitbook.io/alhamrizvi/cool-stuff/building-a-local-ai-model-for-pentesting-from-scratch.md).
# Building a Local AI Model for Pentesting From Scratch
YO everyone, welcome back to my writeup. It’s Alham Rizvi again AND AGAIN, and this time I’m really back with something interesting.
You might be wondering: was I successful?
> The answer is no.
I tried to build an LLM model for pentesting completely from scratch. I spent around 20 days on it, pushed hard, and honestly gave it everything I had. But in the end, I failed.
There were a couple of reasons. First, I didn’t have enough compute/resources to properly train and experiment at the level required, Second, I didn’t want to rely on other people’s writeups or datasets(BECAUSE I HATE THE AI LORE, WHAT DEVELOPERS ARE DOING FOR TRAINING AN AGENT)I wanted this to be original my own data, my own approach. That made things much harder.
Still, I learned a lot during the process. This writeup is not about a success story , it’s about what I tried, what I built, and what went wrong while attempting to create an LLM for pentesting.
I’ll walk through everything, how you could approach building something similar , but just know this isn’t a complete solution, because I didn’t fully succeed.
#### Introduction
Building a penetration testing LLM is not simply downloading a model and asking it hacking questions. It is a disciplined engineering process involving architecture selection, dataset curation, fine-tuning pipelines, tool integration, evaluation frameworks, and responsible deployment. This guide covers every layer of that process in full technical depth.
The end goal is a locally-hosted, security-specialized AI assistant that understands offensive techniques, reasons through attack chains, generates working tool commands, analyzes scan output, and assists in report writing all within a legal, authorized testing context.
#### Section 1 — How a Large Language Model Actually Works
Before building one, you need to understand what you are building.
#### The Transformer Architecture
Every modern LLM is built on the Transformer architecture, introduced in the 2017 paper “Attention Is All You Need.” The core mechanism is the self-attention layer, which allows the model to weigh the importance of every token relative to every other token in a sequence simultaneously.
A token is not the same as a word. The tokenizer (typically BPE — Byte Pair Encoding) splits text into subword units. The word “reconnaissance” might become three tokens: “recon”, “nais”, “sance.” The model never sees raw text — it sees sequences of integer token IDs.
**The forward pass through a transformer block:**
```
Input tokens → Embedding layer → Positional encoding
→ [Repeated N times]:
→ Multi-head self-attention
→ Add & LayerNorm
→ Feed-forward network (MLP)
→ Add & LayerNorm
→ Final linear layer → Softmax → Probability over vocabulary
```
The model predicts the next token. That is the entire training objective. Everything else — reasoning, summarization, code generation, exploit explanation — emerges from doing that one thing at enormous scale.
#### Attention in Detail
The self-attention mechanism computes three matrices from each token embedding: Query (Q), Key (K), and Value (V). The attention score between tokens i and j is:
```
Attention(Q, K, V) = softmax(QK^T / sqrt(d_k)) * V
```
Where d\_k is the dimension of the key vectors. This scaled dot-product prevents gradients from vanishing in high-dimensional spaces. Multi-head attention runs this operation in parallel across H independent heads, each learning different relational patterns — syntax, semantics, long-range dependencies.
#### Parameters and Scale
A 7B model has approximately 7 billion floating-point parameters stored as weights. During inference, each token generated requires a full forward pass multiplying inputs against these weights. At 16-bit precision, 7B parameters consume roughly 14GB of VRAM. At 4-bit quantization (the standard for local deployment), this drops to about 4–5GB.
#### Instruction Tuning vs Base Models
A raw pre-trained model (base model) simply predicts the next token based on its training corpus. It does not follow instructions naturally. Instruction tuning applies supervised fine-tuning (SFT) using prompt-response pairs, teaching the model to behave like an assistant. This is the step you will perform to create your pentesting model.
Beyond SFT, commercial models apply RLHF (Reinforcement Learning from Human Feedback) to align outputs with human preferences. For a specialized security model, SFT alone is usually sufficient.
***
#### Section 2 — Full Architecture Map
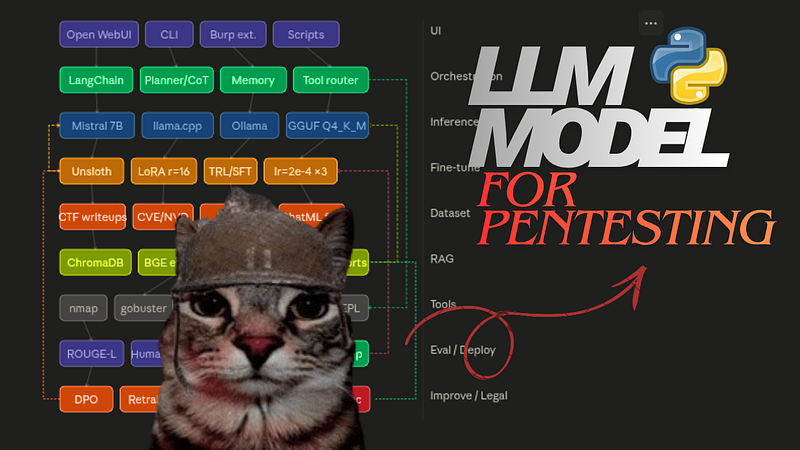
Here is the complete architecture of the system you are building, from user input to final output:
```
┌─────────────────────────────────────────────────────────────┐
│ USER INTERFACE │
│ (Open WebUI / CLI / Burp Extension / Script) │
└──────────────────────────┬──────────────────────────────────┘
│
▼
┌─────────────────────────────────────────────────────────────┐
│ ORCHESTRATION LAYER │
│ (LangChain / smolagents / custom) │
│ │
│ ┌─────────────┐ ┌──────────────┐ ┌────────────────┐ │
│ │ Planner │ │ Memory/State │ │ Tool Router │ │
│ │ (CoT loop) │ │ (context) │ │ (dispatch) │ │
│ └──────┬──────┘ └──────────────┘ └───────┬────────┘ │
└──────────┼──────────────────────────────────────┼───────────┘
│ │
▼ ▼
┌──────────────────────┐ ┌─────────────────────────┐
│ INFERENCE ENGINE │ │ TOOL LAYER │
│ │ │ │
│ Fine-tuned LLM │◄──────────►│ nmap, nikto, gobuster │
│ (Mistral/LLaMA) │ │ sqlmap, hydra, ffuf │
│ │ │ Metasploit RPC │
│ 4-bit quantized │ │ Python REPL │
│ GGUF via llama.cpp │ │ Web search / CVE DB │
│ Served via Ollama │ │ File system R/W │
└──────────┬───────────┘ └─────────────────────────┘
│
▼
┌─────────────────────────────────────────────────────────────┐
│ KNOWLEDGE LAYER (RAG) │
│ │
│ ┌──────────────┐ ┌────────────────┐ ┌─────────────┐ │
│ │ Vector DB │ │ Embeddings │ │ Retriever │ │
│ │ (ChromaDB / │ │ (BGE / E5 / │ │ (top-k │ │
│ │ Qdrant) │ │ nomic-embed) │ │ semantic) │ │
│ └──────────────┘ └────────────────┘ └─────────────┘ │
│ │
│ Sources: CVEs, writeups, ATT&CK, tool docs, reports │
└─────────────────────────────────────────────────────────────┘
```
Every user query travels through this stack. The orchestration layer decides whether to answer from the model directly, retrieve external knowledge first, or dispatch a tool call and feed the output back into the model for interpretation.
#### Section 3 — Model Selection Deep Dive
#### Comparison of Candidate Base Models
Model Parameters VRAM (4-bit) License Strength Mistral 7B v0.3 7B \~5GB Apache 2.0 Best reasoning per GB LLaMA 3.1 8B 8B \~6GB Meta custom Strong instruction following LLaMA 3.1 70B 70B \~45GB Meta custom Near GPT-4 quality DeepSeek Coder 7B 7B \~5GB MIT Code generation focus Phi-4 14B \~9GB MIT Compact, very capable Mixtral 8x7B 47B (MoE) \~28GB Apache 2.0 Expert routing, fast
For a solo researcher on a single consumer GPU (RTX 3090/4090), Mistral 7B or LLaMA 3.1 8B is the correct starting point. For a team with a server running multiple A100s, LLaMA 3.1 70B will produce substantially more useful outputs.
#### Why Not Use GPT-4 or Claude?
You could fine-tune a cloud model through an API, but you lose local control, face data privacy issues (sending target data to third-party servers), have no offline capability, and cannot deeply customize behavior. A local model is the only appropriate choice for real penetration testing work.
***
#### Section 4 — Dataset Construction in Full Detail
The dataset is the most important component of your model. A mediocre model fine-tuned on excellent data outperforms an excellent model fine-tuned on poor data every time.
#### Dataset Taxonomy for Pentesting
Your dataset should cover these categories with roughly the following distribution:
```
Reconnaissance & OSINT ~15%
Network scanning & enumeration ~15%
Web application attacks ~20%
Exploitation techniques ~15%
Post-exploitation & pivoting ~10%
Password attacks ~8%
Reporting & documentation ~7%
Tool command generation ~10%
```
#### Data Sources
**CTF Writeups** The richest source.
Please don’t criticize me, but i am not trying you all to convince about that, you can use other stuff but,
HackTheBox, TryHackMe, CTFtime, and 0xdf’s blog contain thousands of detailed walkthroughs. Each writeup is a complete attack chain with reasoning. Parse them into segments: enumeration step, vulnerability identification, exploitation, privilege escalation, loot.
Scraping script concept:
```
import requests
from bs4 import BeautifulSoup
```
```
def scrape_writeup(url):
soup = BeautifulSoup(requests.get(url).text, "html.parser")
content = soup.find("article").get_text(separator="\n")
return content
```
**NVD / CVE Data** The National Vulnerability Database exposes a full JSON API. Pull CVE descriptions, CVSS scores, affected software, and references. Pair each CVE description with its public PoC from GitHub (search using the CVE ID).
```
curl "https://services.nvd.nist.gov/rest/json/cves/2.0?keywordSearch=SQL+injection&resultsPerPage=100"
```
**MITRE ATT\&CK Framework** Download the full ATT\&CK STIX dataset from the MITRE GitHub. Every technique has a description, procedure examples, detection suggestions, and mitigation. These map directly to offensive reasoning patterns.
**Tool Documentation** Convert man pages and official documentation for every major tool into Q\&A format. Cover: basic usage, flags and options, common recipes, output interpretation.
Tools to cover: nmap, masscan, nikto, gobuster, feroxbuster, ffuf, sqlmap, hydra, john, hashcat, responder, impacket suite, bloodhound, crackmapexec, netcat, socat, pwncat, msfconsole, searchsploit, burpsuite CLI.
**Public Red Team Reports** NCC Group, Bishop Fox, Rapid7, and Offensive Security publish redacted engagement reports. These teach narrative reasoning — how a tester thinks through a full engagement, not just individual techniques.
**Security Books (Public Domain / Licensed)** OWASP Testing Guide (free), PentesterLab exercises, PortSwigger Web Security Academy labs and solutions.
#### Instruction Format
Use the Alpaca format for simplicity, or ChatML format for compatibility with most modern frameworks:
**Alpaca format:**
```
{
"instruction": "What flags does nmap use for a SYN scan with OS detection and version scanning against port 80 and 443?",
"input": "",
"output": "Use: nmap -sS -O -sV -p 80,443 . The -sS flag performs a TCP SYN (half-open) scan. -O enables OS detection. -sV probes open ports to determine service and version info. Run as root — SYN scan requires raw socket privileges."
}
```
**ChatML format (preferred for modern models):**
```
<|im_start|>system
You are a penetration testing assistant operating in an authorized lab environment. Provide technically accurate, actionable guidance.
<|im_end|>
<|im_start|>user
How do I enumerate users on a Windows domain using impacket?
<|im_end|>
<|im_start|>assistant
Use impacket-GetADUsers for domain user enumeration:
```
```
python3 GetADUsers.py -all -dc-ip 10.10.10.1 DOMAIN/username:password
```
```
This queries the domain controller via LDAP and returns all user accounts with their attributes. If you have valid credentials, add -user to filter by specific account. For null session attempts, try anonymous bind: DOMAIN/:@10.10.10.1
<|im_end|>
```
#### Data Cleaning Pipeline
```
import json
import re
```
```
def clean_entry(entry):
# Remove HTML artifacts
entry["output"] = re.sub(r"<[^>]+>", "", entry["output"])
# Normalize whitespace
entry["output"] = re.sub(r"\n{3,}", "\n\n", entry["output"])
# Filter too-short responses
if len(entry["output"].split()) < 20:
return None
# Filter entries with placeholder text
if "TODO" in entry["output"] or "FIXME" in entry["output"]:
return None
return entry
```
```
with open("raw_dataset.jsonl") as f:
raw = [json.loads(l) for l in f]
```
```
cleaned = [c for entry in raw if (c := clean_entry(entry)) is not None]
print(f"Retained {len(cleaned)} / {len(raw)} entries")
```
Target: 10,000 to 50,000 high-quality instruction pairs. Beyond 50,000, quality diminishes unless you are very selective.
***
#### Section 5 — Fine-Tuning Pipeline
#### Environment Setup
```
# System dependencies
sudo apt update && sudo apt install -y git python3-pip nvidia-cuda-toolkit
```
```
# Python environment
python3 -m venv pentest-llm-env
source pentest-llm-env/bin/activate
```
```
# Core packages
pip install unsloth[colab-new] transformers datasets peft trl \
accelerate bitsandbytes wandb sentencepiece
```
Verify GPU access:
```
import torch
print(torch.cuda.is_available()) # True
print(torch.cuda.get_device_name(0)) # e.g. NVIDIA RTX 4090
print(torch.cuda.mem_get_info()) # Available / total VRAM
```
#### Full Training Script
```
from unsloth import FastLanguageModel
from datasets import load_dataset
from trl import SFTTrainer
from transformers import TrainingArguments
import torch
```
```
# Configuration
MODEL_NAME = "unsloth/mistral-7b-instruct-v0.3-bnb-4bit"
MAX_SEQ_LEN = 2048
OUTPUT_DIR = "./pentest-llm-output"
DATASET_PATH = "./pentest_dataset.jsonl"
```
```
# Load base model with 4-bit quantization
model, tokenizer = FastLanguageModel.from_pretrained(
model_name=MODEL_NAME,
max_seq_length=MAX_SEQ_LEN,
dtype=None, # Auto-detect float16 or bfloat16
load_in_4bit=True,
)
```
```
# Apply LoRA adapters
model = FastLanguageModel.get_peft_model(
model,
r=16, # Rank — higher = more capacity, more memory
target_modules=["q_proj", "k_proj", "v_proj", "o_proj",
"gate_proj", "up_proj", "down_proj"],
lora_alpha=16,
lora_dropout=0, # 0 is optimal per unsloth benchmarks
bias="none",
use_gradient_checkpointing="unsloth",
random_state=42,
)
```
```
# Format dataset
def format_entry(example):
return {
"text": f"<|im_start|>system\nYou are a penetration testing assistant.\
<|im_end|>\n<|im_start|>user\n{example['instruction']}\
<|im_end|>\n<|im_start|>assistant\n{example['output']}<|im_end|>"
}
```
```
dataset = load_dataset("json", data_files=DATASET_PATH, split="train")
dataset = dataset.map(format_entry)
```
```
# Training configuration
trainer = SFTTrainer(
model=model,
tokenizer=tokenizer,
train_dataset=dataset,
dataset_text_field="text",
max_seq_length=MAX_SEQ_LEN,
dataset_num_proc=2,
args=TrainingArguments(
per_device_train_batch_size=4,
gradient_accumulation_steps=4,
warmup_steps=100,
num_train_epochs=3,
learning_rate=2e-4,
fp16=not torch.cuda.is_bf16_supported(),
bf16=torch.cuda.is_bf16_supported(),
logging_steps=10,
optim="adamw_8bit",
lr_scheduler_type="cosine",
seed=42,
output_dir=OUTPUT_DIR,
report_to="wandb", # Optional — tracks loss curves
),
)
```
```
trainer.train()
```
```
# Save LoRA adapter weights
model.save_pretrained(OUTPUT_DIR)
tokenizer.save_pretrained(OUTPUT_DIR)
```
```
# Merge and export to GGUF for Ollama
model.save_pretrained_gguf(
OUTPUT_DIR + "/gguf",
tokenizer,
quantization_method="q4_k_m" # 4-bit K-means quantization
)
```
#### LoRA Hyperparameter Guide
Parameter Recommended Range Effect r (rank) 8–64 Higher = more parameters, more capacity lora\_alpha Equal to r Scaling factor for updates lora\_dropout 0–0.1 Regularization, 0 often works best learning\_rate 1e-4 to 3e-4 Too high causes catastrophic forgetting num\_train\_epochs 2–5 More epochs risks overfitting batch size x grad\_accum Target 16–32 effective Stability
#### Section 6 — RAG Knowledge Base
Fine-tuning bakes knowledge into weights at training time. RAG injects knowledge at inference time. You need both: fine-tuning gives the model security reasoning skills, RAG keeps it current with new CVEs, internal notes, and client-specific data.
#### Building the Vector Store
```
from langchain.text_splitter import RecursiveCharacterTextSplitter
from langchain_community.embeddings import HuggingFaceEmbeddings
from langchain_community.vectorstores import Chroma
import os
```
```
# Load embedding model (runs locally, no API needed)
embeddings = HuggingFaceEmbeddings(
model_name="BAAI/bge-large-en-v1.5",
model_kwargs={"device": "cuda"},
encode_kwargs={"normalize_embeddings": True}
)
```
```
# Split documents into chunks
splitter = RecursiveCharacterTextSplitter(
chunk_size=512,
chunk_overlap=64,
separators=["\n\n", "\n", ".", " "]
)
```
```
# Load your security documents
documents = []
for filepath in os.listdir("./security_docs"):
with open(f"./security_docs/{filepath}") as f:
text = f.read()
docs = splitter.create_documents([text], metadatas=[{"source": filepath}])
documents.extend(docs)
```
```
# Build and persist vector store
vectorstore = Chroma.from_documents(
documents=documents,
embedding=embeddings,
persist_directory="./pentest_vectorstore"
)
vectorstore.persist()
print(f"Indexed {len(documents)} chunks")
```
#### RAG Query at Inference Time
```
vectorstore = Chroma(
persist_directory="./pentest_vectorstore",
embedding_function=embeddings
)
```
```
retriever = vectorstore.as_retriever(
search_type="mmr", # Maximal Marginal Relevance — diversity
search_kwargs={"k": 5, "fetch_k": 20}
)
```
```
def rag_query(question):
docs = retriever.get_relevant_documents(question)
context = "\n\n".join([d.page_content for d in docs])
prompt = f"""Use the following context to answer the question.
```
```
Context:
{context}
```
```
Question: {question}
```
```
Answer:"""
return prompt
```
#### Section 7 — Tool Integration and Agent Loop
#### Tool Definitions
```
import subprocess
import requests
```
```
def run_nmap(target, flags="-sV -sC"):
result = subprocess.run(
["nmap"] + flags.split() + [target],
capture_output=True, text=True, timeout=300
)
return result.stdout
```
```
def run_gobuster(target, wordlist="/usr/share/wordlists/dirb/common.txt"):
result = subprocess.run(
["gobuster", "dir", "-u", target, "-w", wordlist, "-q"],
capture_output=True, text=True, timeout=300
)
return result.stdout
```
```
def search_cve(keyword):
url = f"https://services.nvd.nist.gov/rest/json/cves/2.0?keywordSearch={keyword}&resultsPerPage=5"
data = requests.get(url).json()
results = []
for item in data.get("vulnerabilities", []):
cve = item["cve"]
results.append({
"id": cve["id"],
"description": cve["descriptions"][0]["value"],
"cvss": cve.get("metrics", {})
})
return results
```
```
def python_repl(code):
result = subprocess.run(
["python3", "-c", code],
capture_output=True, text=True, timeout=30
)
return result.stdout + result.stderr
```
```
TOOLS = {
"nmap": run_nmap,
"gobuster": run_gobuster,
"search_cve": search_cve,
"python_repl": python_repl,
}
```
#### Agent Loop
```
import json
import requests as http
```
```
OLLAMA_URL = "http://localhost:11434/api/generate"
SYSTEM_PROMPT = """You are a penetration testing assistant. When you need to run a tool, respond with a JSON block:
{"tool": "nmap", "args": {"target": "10.10.10.5", "flags": "-sV -p 80,443"}}
Otherwise respond in plain text. Always explain your reasoning before using a tool."""
```
```
def agent_loop(user_message, max_iterations=6):
conversation = user_message
results = []
```
```
for i in range(max_iterations):
response = http.post(OLLAMA_URL, json={
"model": "pentest-llm",
"prompt": f"{SYSTEM_PROMPT}\n\nConversation:\n{conversation}",
"stream": False
}).json()["response"]
```
```
results.append(("assistant", response))
```
```
# Check for tool call
try:
tool_call = json.loads(response)
tool_name = tool_call["tool"]
tool_args = tool_call["args"]
```
```
if tool_name in TOOLS:
tool_output = TOOLS[tool_name](**tool_args)
conversation += f"\nTool output ({tool_name}):\n{tool_output}"
results.append(("tool", tool_output))
else:
break
except (json.JSONDecodeError, KeyError):
break # Plain text response — done
```
```
return results
```
***
#### Section 8 — Deployment
#### Deploying with Ollama
```
# Install Ollama
curl -fsSL https://ollama.com/install.sh | sh
```
```
# Create Modelfile
cat > Modelfile << EOF
FROM ./pentest-llm-output/gguf/model-q4_k_m.gguf
```
```
SYSTEM """You are a specialized penetration testing assistant operating in authorized lab environments. Provide technically accurate, detailed guidance on offensive security techniques."""
```
```
PARAMETER temperature 0.3
PARAMETER top_p 0.9
PARAMETER num_ctx 4096
PARAMETER repeat_penalty 1.1
EOF
```
```
# Register and run model
ollama create pentest-llm -f Modelfile
ollama run pentest-llm
```
Lower temperature (0.2–0.4) is correct for technical tasks. You want deterministic, accurate outputs, not creative ones.
#### Open WebUI Setup
```
docker run -d \
-p 3000:8080 \
-v open-webui:/app/backend/data \
-e OLLAMA_BASE_URL=http://host.docker.internal:11434 \
--name open-webui \
ghcr.io/open-webui/open-webui:main
```
Access at . Supports multiple models, conversation history, document uploads, and system prompt configuration per conversation.
***
#### Section 9 — Evaluation Framework
```
import json
from rouge_score import rouge_scorer
```
```
eval_set = [
{
"question": "What is the nmap flag for UDP scanning?",
"expected_keywords": ["-sU", "UDP", "root", "privilege"],
"reference": "nmap -sU requires root privileges and scans UDP ports."
},
{
"question": "How do you identify SQL injection manually?",
"expected_keywords": ["single quote", "error", "boolean", "time-based"],
"reference": "Inject a single quote. Look for database errors. Test boolean conditions."
}
]
```
```
def evaluate_model(model_fn, eval_set):
scorer = rouge_scorer.RougeScorer(["rougeL"], use_stemmer=True)
scores = []
```
```
for item in eval_set:
response = model_fn(item["question"])
# Keyword coverage
keywords_hit = sum(1 for kw in item["expected_keywords"]
if kw.lower() in response.lower())
keyword_score = keywords_hit / len(item["expected_keywords"])
# ROUGE-L against reference
rouge = scorer.score(item["reference"], response)["rougeL"].fmeasure
scores.append({
"question": item["question"],
"keyword_coverage": keyword_score,
"rouge_l": rouge,
"response": response
})
```
```
avg_keyword = sum(s["keyword_coverage"] for s in scores) / len(scores)
avg_rouge = sum(s["rouge_l"] for s in scores) / len(scores)
print(f"Avg keyword coverage: {avg_keyword:.2%}")
print(f"Avg ROUGE-L: {avg_rouge:.4f}")
return scores
```
Human-evaluate a random 50-entry sample monthly. Automated metrics catch regressions; human evaluation catches drift in reasoning quality.
#### Section 10 — Iterative Improvement
Your model is never done. After initial deployment:
**Collect failure cases.** When the model gives wrong tool flags, hallucinates CVE details, or misses attack vectors, log those queries. They become the most valuable training examples.
**Run DPO (Direct Preference Optimization).** For the cases where you have a bad response and a corrected response, DPO fine-tunes the model to prefer the better answer without full retraining. The `trl` library supports DPO directly.
**Expand the knowledge base.** Add new CVEs weekly. Subscribe to NVD’s JSON feed and automate ingestion into your vector store.
**Retrain quarterly.** Accumulate 1,000–3,000 new high-quality examples and run another LoRA fine-tuning pass using the previous adapter as the starting point.
#### Section 11 — Legal and Ethical Framework
No section of this guide is more important than this one.
Everything described here — the model, the tools, the agent loop — must operate exclusively against systems you own or have written authorization to test. Fine-tuning a model on offensive security knowledge does not make its outputs legal to act upon. The model is a tool. Authorization governs the tool’s use, not the tool itself.
Maintain an engagement log. Every test conducted with AI assistance should be documented with scope, authorization reference, timestamp, and findings. Keep the model air-gapped from any client network. Never feed client data — hostnames, IPs, credentials, scan results — into a cloud API.
Treat this model with the same operational security discipline as any other offensive tool in your kit.
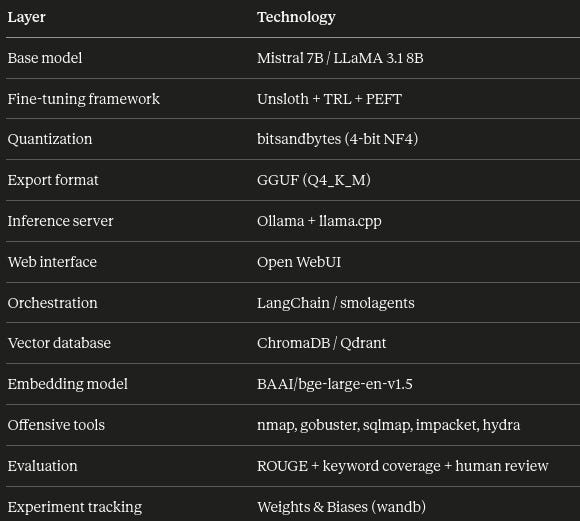
#### Quick Reference — Full Technology Stack
Alright, that’s it for this writeup.\
If you found this interesting, feel free to follow me for more content like this.\
Have a great day.
---
# Agent Instructions
This documentation is published with GitBook. GitBook is the documentation platform designed so that both humans and AI agents can read, navigate, and reason over technical content effectively. Learn more at gitbook.com.
## Querying This Documentation
If you need additional information that is not directly available in this page, you can query the documentation dynamically by asking a question.
Perform an HTTP GET request on the current page URL with the `ask` query parameter, and the optional `goal` query parameter:
```
GET https://alham-rizvi.gitbook.io/alhamrizvi/cool-stuff/building-a-local-ai-model-for-pentesting-from-scratch.md?ask=&goal=
```
`ask` is the immediate question: it should be specific, self-contained, and written in natural language.
`goal` is optional and describes the broader end goal you are ultimately trying to accomplish on behalf of the user. GitBook uses it to tailor the answer towards what is most useful for that goal.
The response will contain a direct answer to the question and relevant excerpts and sources from the documentation.
Use this mechanism when the answer is not explicitly present in the current page, you need clarification or additional context, or you want to retrieve related documentation sections.